I previously posted looking for advice on turning my old steel-framed mountain bike into something I could use to haul groceries and maybe some bits of furniture I find on trash day.
I got a ton of helpful suggestions, and started out on what I think will be a gradual project as I make incremental improvements to this bicycle.
Step 1 was adding a rear rack, so I could add cargo panniers, or a basket behind the seat.

I settled on this one because I liked the extra support legs, and because it claimed to be able to support more weight than most other designs (something I remain skeptical about, but I’m pleased with the overall construction so far).
I did find that the right side seat stay was too crowded for two of the wraparound attachments to fit, so I’d need to use the built-in attachment point just above the rear gear.
Unfortunately, the lower support rod segment was too short to reach the attachment bolt. But that was fixable - the rod was just a length of 3/8 steel round stock with a flattened section where it bolted to the wraparound attachment bracket. It would be pretty easy to make one of my own.
I started by buying some 3/8” steel rod and a fresh can of propane for my offbrand bernzomatic torch (on two trips, one by train, one by bike because I didn’t realize the old one was empty till I tried to use it).
 (Test fitting the 3/8 rod into the upper section of the telescoping rear post)
Then I got some of my old forging tools together. Without a proper forge or anvil, I knew it’d be pretty sloppy blacksmithing, but I didn’t need this to be particularly fancy.

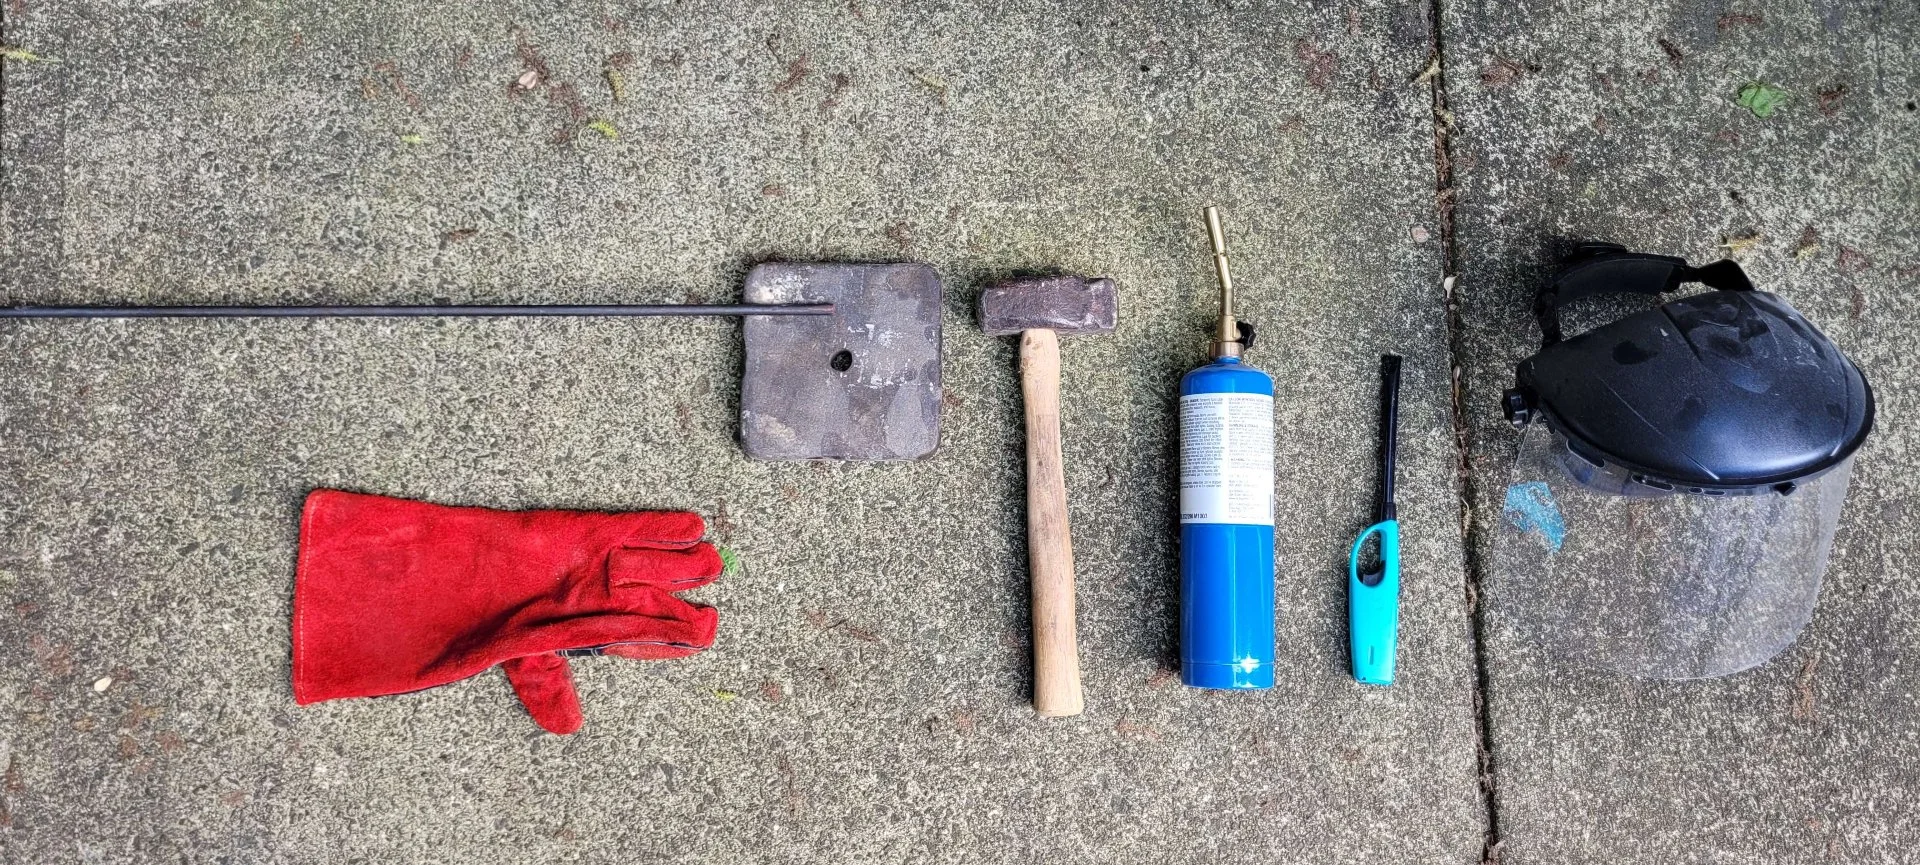
From left to right: 3/8ths steel round stock, fireplace glove, a steel block I found on the side of the road (my anvil, at the moment), my favorite forging hammer (combination round peen and straight peen), offbrand bernzomatic torch, lighter because I couldn’t find my striker, and a face shield because you should wear safety goggles while forging (and this was easier to find)
I didn’t take any pictures while working because I didn’t want to waste additional fuel. Basically I just heated the end up as much as I could without a way to contain the heat, and hammered the daylights out of it whenever it seemed to be as hot as it’d get. It was halfway closer to cold forging than proper blacksmithing but I managed to spread the end of the rod flat enough to drill a hole through safely.

I used the drill press, a metal-drilling bit, and a bunch of tap oil, and went through the center of the piece without any real difficulty.
Once the hole was positioned, I used the grinder to clean up the overall shape of the forged part a little. Like the old wisdom says: a grinder and paint makes me the welder (or blacksmith) I ain’t.

(Top: the new one. Bottom: the original/stock part)
I decided to go much longer than necessary, which I suppose adds a little weight, but also some strength as we’re not relying on as much of the hollow tube it attaches to for structural support.

Once it was cleaned up and the oil removed, I spraypainted it. It would have been easy to go with Gloss Black to match the rest of the bike rack (I had a can of it handy) but I decided to paint it blue. I’d just put some work into making this part custom, and I’m working on rethinking if my goal needs to be to make something look like a product in the first place. For now I don’t mind calling a little attention to it.
Plus, the bike never looked great, which works great for me. One of my relatives found it rusting in a sandpit, gave it to me my first job away from home, and I’ve replaced piece after piece back when it was my sole means of transportation. For quite awhile it was held together with zip ties and various kinds of tape (and featured a fender made from cut-up gatorade bottles and duct tape) and the overall look meant it wasn’t exactly a high priority target for theft.

I gave the paint the full 24 hours to dry, then assembled the last bit of the rack.

Looking decent!
I have some panniers a relative gave me to hang over the rack if I can ever figure out how these straps work, but I wanted to see if it would work with a big steel basket I got out of a dumpster awhile back.

Turns out it’s ridable, though heavier than I’m used to. Cargo would likely make it even more tippy, though maybe not more so than those child seats I’ve seen around? Just the same, I suspect if “bicycle pickup truck” was a good idea, more people would be doing it so I’ll swap on the panniers soon.
Next steps will be to add panniers, better brakes (per the previous post), and I think a frame bag and a handlebar basket.
Edit: I’ve removed the basket and I think I understand the paniers. I just don’t trust the attachment system to stay attached and not get tangled up in the rear wheel and chain. Each side has an adjustable strap with a hook, and a loop of strap sewn on. It just seems like with the flex and stretch of the cloth bags as the bike moves and bounces along, it’d be too easy for the hook to come unhooked, at which point it’d be awesome at snagging a spoke or something. So I’ve got it hooked together I think the way it’s intended, and a few zip ties should make sure it stays that way. When I go to buy bigger panniers someday (these are fairly small) I think I’ll want ones with buckles or something more secure but still removable.


The benefit of having the panniers is that the weight is closer to the ground, which will improve handling and balance, and is therefore safer.
To be honest, I got the heebies when I saw the picture of the crate on the back. Definitely don’t do that! It would not be at all safe in my opinion.
Yeah I’ll swap it for something smaller/lighter, and the set of panniers I already have (though I think their current strap/hook configuration seems like an accident waiting to happen so I’ll probably mess with that too)
This bucket pannier followed plans from “Portland by Cycle”: https://www.portland.gov/transportation/walking-biking-transit-safety/documents/instructions-building-inexpensive-bike/download
I found that I needed to make my own hooks by bending flat steel straps. An important addition to the plans is the addition of the backing plate inside. I used some scrap plywood and fender washers. My last bucket lasted about 7-8 years until it was stolen, so I’ve also added a way to lock it to the bike rack.
If you put the hooks at the right level vertically then the top of the lid is level with the bike rack allowing you to securely strap even more stuff on the back of the bike.
That’s awesome and I’m totally going to do this. I’d been looking for some kind of basket or other hard pannier I could just drop the regular grocery totes inside, I should have thought of this.
Just updating to note that I’ve acquired two square buckets and am going to start this build. Thanks again!
Sorry, after joining with much enthusiasm, my life was overtaken by other responsibilities and pressures. I’m in a much better place now (camping and relaxing without internet or TV helps!) Let me know how the bucket build goes. I’ll watch the utility cycling and fixing communities for updates.
Sounds good! And I definitely will! I’ve been making some grocery trips with the cloth bags and milk crate, and it’s fine, but it’d be nice if I could just drop the totes into the panniers without having to load and unload them one item at a time, so it’s definitely worth doing. I’ll probably start on it later this month. Glad you’re in a better place!