Right now, at least for this type of shooting I was doing, I was going more for subtle editing. However, I’m new to both photography and editing. I’ve set my Rebel T7 to shoot both high-def JPG and RAW because some pictures I’ve taken I haven’t wanted to touch up a lot for one reason or another.
I’m dipping back into editing, and was hoping for some input into shooting tips and editing the photos.
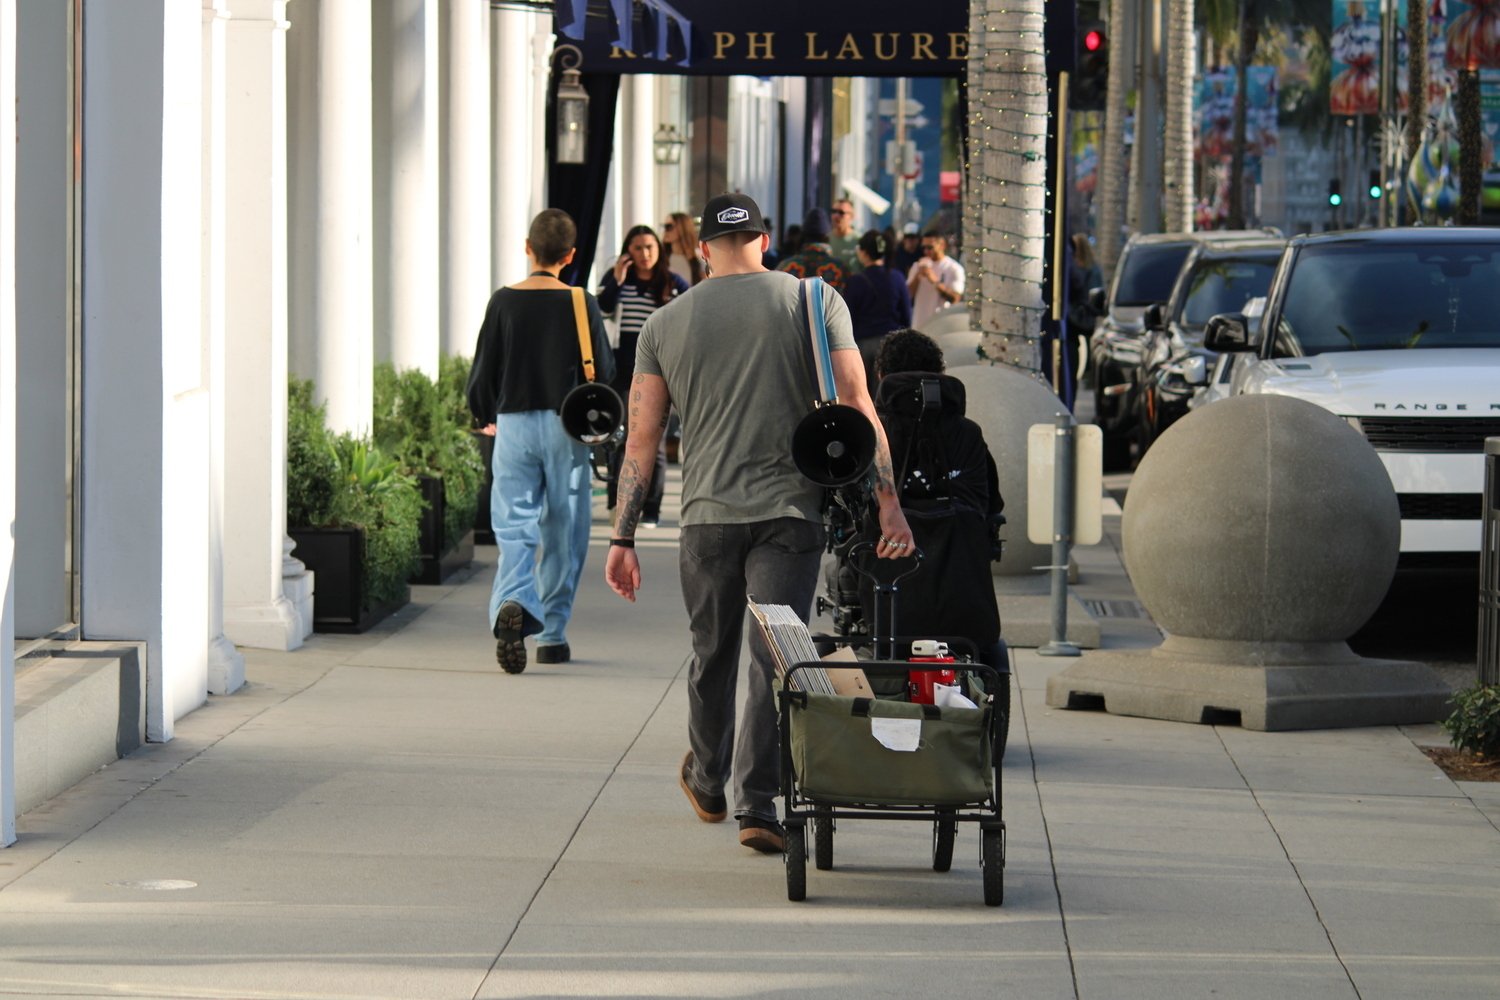 This is the JPG the camera generated.
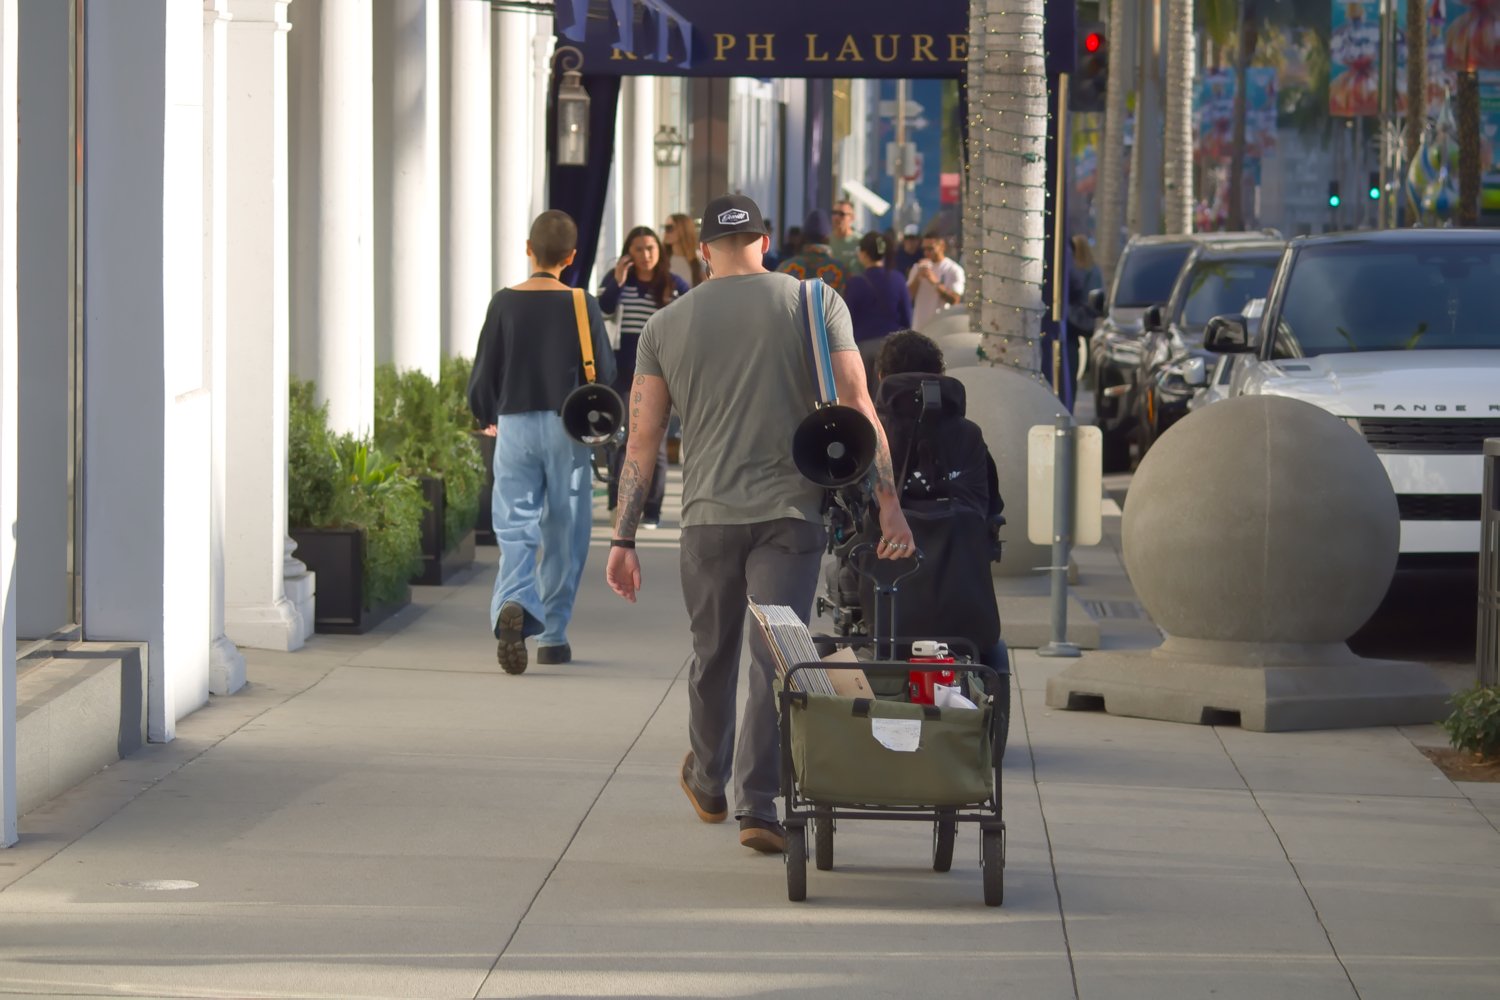 This was my first RAW edit. Untouched white balance with increased saturation, vibrancy, and a little noise reduction.
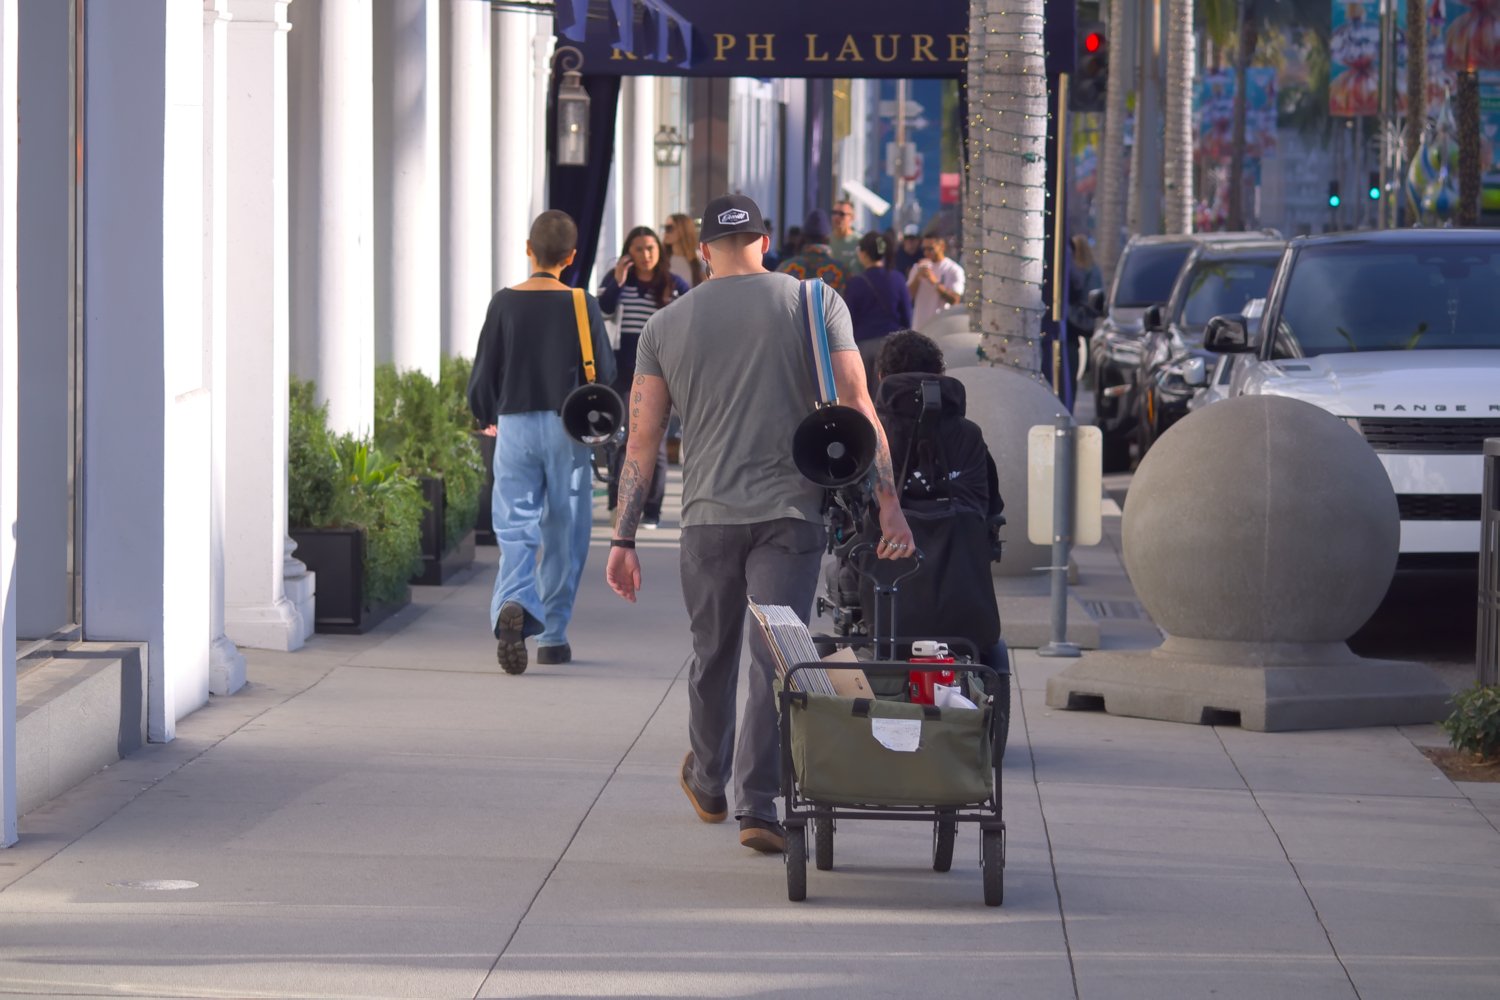 This is the next RAW edit where I allowed an auto adjustment of the white balance (The lighting was 2pm in Beverly Hills, if that adds context) and actually used less noise reduction.
Thank you in advance. I know these pictures aren’t very good, but I know I gotta keep working at it if I ever wanna get any better.
The 2nd version (your first RAW) edit seems the most natural to me.
It has a slight green cast. Thought that may be accurate with trees overhead out of frame.Most people will probably prefer the original JPEG, because it’s got lower black levels, and more color saturation. But it’s just a little over done for my taste. Somewhere between that and your first edit would be the sweet spot I think.
The auto WB just looks wrong. I think it’s overcompensating for the green cast, now it’s too pink.
At these scaled down resolutions, we can’t see the difference in noise reduction.
But at bright daylight ISO levels I doubt you need any. Maybe just a little color noise reduction if you’d like.This has given me a lot to think about. Thank you! I felt the saturation I had used had been a bit much, but I was aligning the scheme somrwhat with a previous photo that contained a sign in the shot where the JPG managed to capture a vibrant red I was trying to re-create in my edit. I’d completely forgotten I’d had a small amount of success with color corrections once before, and I bet that would work wonders so I don’t have to amp up the saturation so much.
Edit: Yeah, sorry about the image scaling. I’d done it on the original JPG when I was sending it out to someone, so I just made the others scaled down to match.
What software do you use ?
I recommend Darktable (it may be a little intimidating at first but youtube has a shit ton of good tutorials)
In darktable there are many ways to achieve the same result
Take a look at this: https://avidandrew.com/darktable-scene-referred-workflow.html
And these tutorials for beginners : https://www.youtube.com/channel/UCt6U6IJ2myOToBFeVL-EaXA <-- amazing quality, concise
Oh and the most important thing, I can’t stress this enough: learn masks and ESPECIALLY Dodge & Burning
D&B tutorial: https://www.youtube.com/watch?v=JFTA7ovTrzQ <-- 👀
(Btw this guy is great)
I hope you’ll post you next pictures !
I use a fork of rawtherapee called ART. It just changes the UI around a bit.
I only tried Darktable once. I loaded up a beach shot, and the RAW file had a lot of colors that looked so wildly different from the cameras preview (I know that the preview has its own process for displaying images) that following troubleshooting tips I searched for weren’t able to completely correct how it looked. It was a very violet-tinged sunset. ART typically started somewhere infelt more comfortable working from. I’m sure I could give it another shot.
Yeah, darktable prides itself on having the bare minimum amount of base processing (and you can even revert those by clicking around in the “history” tab)
I can give you a good starting preset if you want, then you can use very powerful tools such as color balance rgb or color zones to tweak them to your liking
I promise I’m not paid by Big Darktable xD
Sure, I’ll take any help I can get!
Hi there! Shooting in both JPG and RAW is a great way to give yourself flexibility with editing, especially as you’re still exploring your style. RAW files are perfect for subtle adjustments without losing image quality, which sounds ideal for the look you’re aiming for.
If you’re looking for an easy editing tool, PicsArt Premium APK is worth a try! It offers simple yet powerful features like brightness adjustments, color corrections, and creative filters—perfect for experimenting with different editing techniques as you refine your photography skills.
Happy shooting and editing! 😊
The Cam’s first JPG is the best of these three. Color and contrast are both stronger and better balanced than in the edits.
You could work through some tutorials on youtube.
Have you tried what Canon DPP calls Gamma Adjustment, or what I think of as “the Histogram Tool”? Depending on your tools, it should at least have a top (light), middle and bottom (dark) marker that you can slide. The most impactful is the middle one, pushing it towards the top (light) end, can add impact (greater changes in brightness in the middle of the range) and remove a washed out look, whereas going the other way can bring out some milder darker areas without affecting the strong darks and lights. To me, it seems likely the JPG had that midpoint pushed a little towards the top end, so that the JPG feels less washed out than the RAW.
Loosely, Gamma Adjustment allows a more controlled change from just an overall Brightness Control, withe Shadows and Highlights controls somewhere in between.
Less relevant here, but the top marker can be used to bring overblown pixels back into having graduations and throwing away the detail in a boring grey/white sky (opening up a greater range of brightnesses elsewhere), while the bottom marker can throw away the detail in the darkest shadows.
In passing, if your third party tools “start” with your RAW photo displaying differently to the JPG you might benefit from looking at Canon’s own tools. I’m guessing Canon DPP4 still works with your camera’s photos, and if so, it’s both free and remarkably powerful for a free tool - though it’s mostly only about global edits. It also “starts” at what your camera would do before saving as a JPG. You can probably work in DPP, save in TIFF format, and import that TIFF into your third-party tool and not lose any of the information to allow detailed editing, alternative de-noising, balancing and sharpening approaches, etc.
In passing, don’t be too dismissive of your shooting skills - that picture is sharp, interesting subject, and nicely cropped or framed. Not a prize-winner, but worth keeping.
I’ll look into it, but it seems like it only supports windows.
Thank you for the compliment. A lot of these shots are less than stellar because I had to be quick, usually, and I haven’t really gotten that down too well.
Ah, there I am making assumptions again!
Still, some sort of histogram tool should be present any anything that pretends to process RAW files, and is often my only post-processing after cropping (admittedly, for bird photography, where I don’t usually want to tamper with colour).
On speed - the real trick on situations that change is to train yourself to take any sort of shot first for the memory, and only then think about framing, angle, best focus technique and all those sorts of things that take time and lead to missing the opportunity all together.

