Just about all of my prints have these lines at around the same heights, and I can’t figure out why. I tried changing the nozzle, changing the layer height from 0.15 to 0.12, and changing the speed from 60mm to 40mm. All of these seemed to have helped a bit, yet they remain. I was thinking maybe as the prints get to a certain height, the shaking of the bed (Prusa MK2) caused the layers to be slightly offset perhaps. Anyone have any other ideas?
Horizontal banding can be caused by a few things
- the slicer making the nozzle move differently between layers because there are different features in different layers. You can usually see this in the sliced gcode preview with something like nozzle speed
- inconsistent extrusion due to variation in hot end temp and/or filament width
- lead screw wobble. This will show up as a repeatable pattern along the z axis
- binding in the z-axis
- something loose, most likely on your gantry
If you print two different models and it happens at the same z height you can basically guarantee it’s a mechanical issue. If it’s more random you’ll need to troubleshoot further.
inconsistent extrusion due to variation in hot end temp and/or filament width
Also, a moist filament.
Check the Y and X axis for dirt or imperfection, thight all the screws and be sure the printer sits on a stable base.
deleted by creator
The fact the lines are at the same height between different jobs suggests something is wrong with your Z axis. Can you post photos of your printer, including the Z rails and/or screws?
Sorry for the late reply, tied up. Thankyou for the photos.
The Z-axis leadscrews look OK in the photos (nothing obviously wrong). That’s a very clean and new printer.
Q1. Is there any grease on those Z-axis leadscrews (tall metal spiral rods) or are they completely dry?
Q2. If you force your printer to move up and down does it make unusual noises at some parts of its travel height? You can try typing thing g-code into your printer monitor software to make it move up and down:
G0 Z100 F1000   (move to Z position 100mm.  You won't actually travel at 1000mm/minute, instead the printer will do whatever it's max is)
G0 Z0 F1000    (move to Z position 0mm, ie nozzle touching the bed)
You may need to home the axes first (G28)
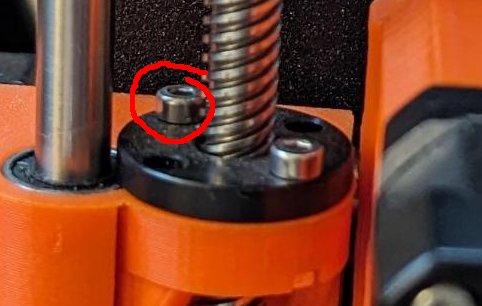
Q3. Are these screws on both sides properly tight? I think I might possibly see a gap under one, but it could also be an optical illusion from reflections.

Thank you, and no worries on the late reply. I’ll check all of this soon. You are right in there being a small gap there. It is normally tight, however I did loosen it a smidge because someone in a video mentioned that might add some forgiveness if one of the screws (or leadscrews as I’m learning) is not true.
Those screws are/ were dry though. I recently put a small amount of WD-40 onto a paper towel and cleaned them up a bit (maybe not the best choice vs a machine oil or something similar).
Along with ekZepp’s, check the z carriage as well- both the rail carriages for play and the lead screw for straightness.
I’ve seen similar happening on my bro’s ender, and he had to install a brace going up from the front of the printer to the top of the upright, but I’m not sure how rigid a mk2 is.
It does seem like one of the screws it touching the side of the stabilizer at the top, and the other is perfectly straight and isn’t, so I might need to look into that. Thanks for pointing me in the right direction.
It could be skipped steps, a warped Z axis, lash in the axis. It doesn’t look like ringing to me.
If your steppers run too hot or against too much resistance that’d be the first thing I’d check. As well as give the axes a bit of a yank and ensure it’s all to the German spec.
Thank you!
I had very bad lines because my print head carriage was lose. Just check if alle the axes are tight.
I actually had a slightly different issue. Having an Ender clone of dubious provenance, I needed to let just the tiniest amount of slack into the Z-coupler so the screw wouldn’t bind and cause banding. It’s the upright extrusions that should provide lateral stability for the Z axis.
Might need to add a cooler to the nozzle
Hey what is thing that you printed? The shape intrigues me
It’s a case for a Meshtastic node :) super fun project
I was having this problem, combined with a confusing bed adhesion issue. My gantry needed to be releveled.
I have a different printer; it was a pretty involved process that required partial disassembly. I imagine this is very printer specific.
Gotcha, thank you!
New Lemmy Post: Lines in prints (https://lemmy.world/post/10611049)
Tagging: #3dprinting(Replying in the OP of this thread (NOT THIS BOT!) will appear as a comment in the lemmy discussion.)
I am a FOSS bot. Check my README: https://github.com/db0/lemmy-tagginator/blob/main/README.md


