
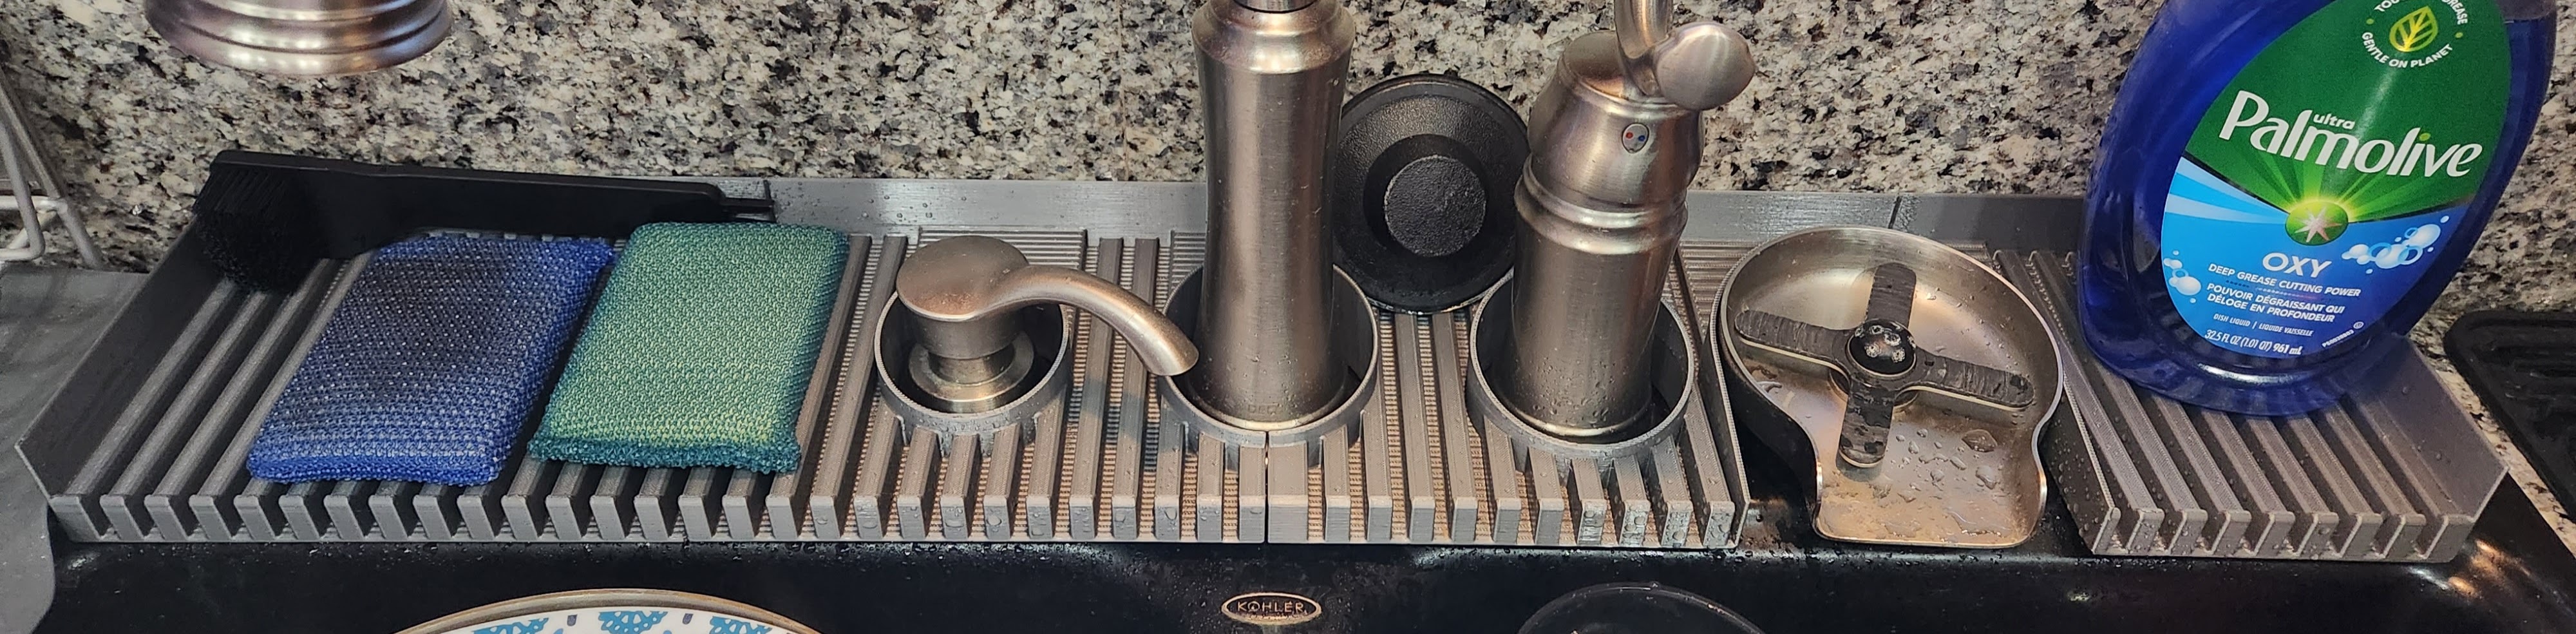
I printed a small sponge holder a while back and have been using it about a year now. Ive been seeing these ads for silicone drainers lately and decided to make something similar. This is actually v2. The first one had a separate base and grates on top but I didn’t like how it turned out. This is a combined grate and base. Printed in 4 pieces and welded together.
You must log in or register to comment.
What’s the deal with The Blade that’s on there? It looks like the underside of a lawn mower except with two extra blades.
LMAO, that’s a glass rinser. You put your glass on it upside down and it shoots water up into the glass.
Oh! Neato!
Very! You see then in breweries a lot.
whoa, relevant username!
I wonder if they get notified every time someone says their name? XD
The glass cleaner was the first thing I saw here. I love it!! And the sponge holder is pretty nifty too
Looks good! I’d recommend printing the base layer in line with how the water will drain out. As it is now, you have the ridges perpendicular which is going to retain more water
I guess it’s hard to see but it’s angled in between the slats. The top is horizontal, but the water falls right into the slats and drains out.
Here’s a video: https://streamable.com/p1g18u
I think he was talking about the grain of the print. The grain is perpendicular to the flow of water which would allow water to stay between the gaps.
I guess so. The large horizontal lines are “steps” from the layer lines. I printed at 0.20mm. It’s never going to drain every little bit of water. It just needs to not pool water.
brilliant!!
Thank you!
Cool!
I’ve been wanting to do something like this for a while, but was always worried about the water. I was thinking of getting some epoxy resin and coating it.
Thanks. Epoxy definitely wouldn’t hurt, but I don’t find it necessary. The old one, printed in PLA, I used about a year with no issues.
That’s good to hear!
Might be the push I needed to give it a go :)
Post if you do. Love seeing interesting household prints. If you’re curious, how I designed it, I took an overhead photo and brought that into Fusion360. Scaled it to proper size and then just designed on top of the canvas. Did the same thing with a silverware organizer I made a while back. Took a few test prints (just a 1mm base with the holes cut out). I had to make a few fine adjustments, but it fits perfectly now.
Cool! Will do :)
I’ve always been meaning to try the photo thing - I’ve always just reverted to making some sketches on an ipad/paper, and taking as many measurements as I can, and then printing some test fits.
Same, it really depends on what I’m making, I guess. Bigger things I need to fit in/around stuff I tend to take photos. But I always do a bunch of test prints anyway.
Yeah, I’ve always been meaning to get that process tightened down Abit to minimize the number of iterations required. Though I haven’t figured out what that would entail lol.
The photos help for me, but I mostly just try to make as many modifications as I can for each iteration. And I print 1mm ‘base’ prints until I’m satisfied it’s ready for the final.
Impressive, even more the features your sink have 😉
Haha, yeah the thing on the left is a soap dispenser but I’ve never used it. And I added the glass rinser.
Is that spinny thing the glass rinser?
Yep, they are super nice and easy to install, especially if you have a hole already there. I would have removed the soap dispenser and used that if the extra hole wasn’t there already.
This is all one piece
How big is your printer?
Lol, sorry. I meant it was one piece, i.e. not base and grate. I’ll reword it. It’s 4 printed pieces welded together.
Do you use heat welding or a solvent?
Welded with a soldering iron.
I think OP wasn’t clear. It’s at least 4 pieces if we’re going by seams. Probably meant that it’s a single unit now, as in it’s all connected together
Yeah exactly, sorry about that. I reworded the post.
Zooming into the image, by “all one piece,” they mean the grates and bottom plate, as there are seams along the back wall at about one average bed width apart
This is pretty intense. Hope it works out long term. Curious how it goes keeping it clean after a few months.
If im not wrong OP said they have been using it for a year already
This one is new, but I had a small one that just held the sponges that I had been using for about a year with no issue. It was a separate grate and base design though.
This really cool. I would buy this. Some many frustrations at the sink for a perfectionist
Thanks. A great majority of my prints are for stuff around the house that isn’t really necessary, but nice to have, haha.
Removed by mod
I made it in Fusion360. Can send you the file if you want.
Removed by mod
http://files.canthidium.com/drainer.f3d
Here you go. Let me know if you have any issues or questions. I try to use sketches and organize, but I’m not great at it yet, lol.
Removed by mod
I made something like this for my sink. It’s basically a ramp that directs water back into the sink near the faucet. Wet hand + faucet handle over counter = water on counter. We’ve since changed our instant hot water tap, so the fixture doesn’t fit as well as it used to, but it’s still good enough.


